Table of Contents
AVR Programmer built from a USB Keyboard
Recently, my keyboard became louder and louder while typing, so I decided to buy a new one. But what to do with the old one? Ever since I saw the AVR programmer that uses a USB hub, I thought of abusing a USB keyboard for that.
Theory
Most keyboards have at least three indicator LEDs (Num-, Caps- and Scroll-Lock), which can be controlled from the host using a HID Set_Report request, and thus can be used as general purpose outputs. The inputs are a bit more tricky, since the keyboard uses a scan matrix divided in rows and columns. Most keyboards also do some debouncing and detect rows that are 'stuck', which means that we need to simulate the keypress of a single key. If a key has been pressed, the keyboard triggers an interrupt transfer with 8 bytes of data, containing the current state of all keys. The first byte reflects the state of the modifier keys (shift, ctrl, alt, etc.) which I'll be using as inputs. Additionally, the keys can be polled using a Get_Report request to the control endpoint, but the interrupt transfers need to be handled either way, since my keyboard just locked up after the first keypress when I didn't handle them first.
Hardware
The keyboard I've been using is a Microsoft Digital Media Keyboard 3000, which contains the following PCB:


The fourth LED (function lock) can't be controlled from the host (although the HID specification allows two more LEDs, 'Compose' and 'Kana').
For emulating a single keypress, I'm using an optocoupler to connect the row and column of that key. Most switching PSUs use an optocoupler for the feedback loop, so I salvaged mine (KB817-B) from an old mobile phone charger:

And that's basically all that's needed, here's the finished setup:

You can see the keyboard controller PCB, the optocoupler, an Atmel ATtiny2313 microcontroller, and an LED for testing the simple blink program I flashed. I desoldered the LEDs and directly connected the 5V outputs (since there were already 330Ω current limiting resistors in place) as follows:
| Keyboard | ATtiny | direction |
|---|---|---|
| Num lock | SCL | out |
| Caps lock | MOSI | out |
| Scroll lock | Reset | out |
| row/column of right shift key | MISO (through optocoupler) | in |
For the optocoupler I added a 470Ω current limiting resistor.
Software
First I wrote a small libusb-based test utility for experimenting with the keyboard. I'm directly communicating with the keyboard from userspace, unloading the kernel driver first.
Speed
Just toggling the LEDs in a while-loop gives a signal fluctuating between 500 Hz and 1.2 kHz on the output, which is faster than I assumed. Unfortunately, the inputs are much slower, since the rows are only scanned at 250 Hz on my keyboard:
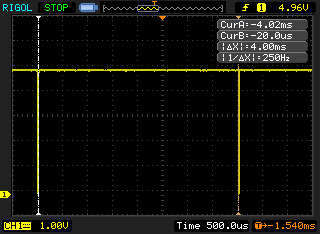
In addition to that, the keyboard seems to debounce the keys, which means that in the worst case it takes 40ms for the host to know the state of the input. That's quite a bummer, since it drastically limits the not-so-bad output speed.
AVR Programmer
After some initial tests, I wrote an interface driver for avrdude. The code can be found on github: https://github.com/steve-m/avrdude, and can be cloned with:
git clone git://github.com/steve-m/avrdude.git
So far this has only been tested with Linux, but it should work fine on Windows and OS X as well.
Results
$ ./avrdude -c hidkey -C avrdude.conf -p attiny2313 -U flash:w:main.hex:i -V

avrdude: AVR device initialized and ready to accept instructions

Reading | ################################################## | 100% 4.17s

avrdude: Device signature = 0x1e910a
avrdude: NOTE: "flash" memory has been specified, an erase cycle will be performed
         To disable this feature, specify the -D option.
avrdude: erasing chip
avrdude: reading input file "/home/steve/dev/hid_gpio/avr_demo/main.hex"
avrdude: writing flash (86 bytes):

Writing | ################################################## | 100% 123.79s

avrdude: 86 bytes of flash written
avrdude: verifying flash memory against /home/steve/dev/hid_gpio/avr_demo/main.hex:
[skipped]
Well, as you can see, programming takes quite a while, mainly because of the slow input speed I mentioned before, but is very reliable. Since I assume that many people have some old USB keyboard lying around collecting dust, it still could be used as a bootstrap flasher for solving the old chicken-and-egg problem when building a faster programmer (USBasp, USBtinyISP) or as low-speed general purpose output for other applications. For example, many outputs could be driven using a simple serial-in, parallel-out shift register.
Update #1
Since reading the MISO input is much slower than writing the outputs, as I mentioned above, I took a closer look at the avrdude code. As it turns out, the inputs are read every time, even if the data isn't used at all afterwards (like when writing a byte). I applied a crude hack, so that MISO is only being read if the data is used afterwards. I pushed that change to a new speedup branch on github.
With those changes, flashing my 86 byte demo application is now over ten times faster (11.75s vs. 123.79s)!
$ ./avrdude -c hidkey -C avrdude.conf -p attiny2313 -U flash:w:main.hex:i

avrdude: AVR device initialized and ready to accept instructions

Reading | ################################################## | 100% 4.33s

avrdude: Device signature = 0x1e910a
avrdude: NOTE: "flash" memory has been specified, an erase cycle will be performed
         To disable this feature, specify the -D option.
avrdude: erasing chip
avrdude: reading input file "/home/steve/dev/hid_gpio/avr_demo/main.hex"
avrdude: writing flash (86 bytes):

Writing | ################################################## | 100% 11.75s

avrdude: 86 bytes of flash written
avrdude: verifying flash memory against /home/steve/dev/hid_gpio/avr_demo/main.hex:
avrdude: load data flash data from input file /home/steve/dev/hid_gpio/avr_demo/main.hex:
avrdude: input file /home/steve/dev/hid_gpio/avr_demo/main.hex contains 86 bytes
avrdude: reading on-chip flash data:

Reading | ################################################## | 100% 124.25s

avrdude: verifying ...
avrdude: 86 bytes of flash verified

avrdude: safemode: Fuses OK

avrdude done.  Thank you.
Programming the whole flash of the ATiny2313 now only takes 4 minutes 37 seconds:
$ ./avrdude -c hidkey -C avrdude.conf -p attiny2313 -U flash:w:/tmp/usbtiny.hex:i
avrdude: AVR device initialized and ready to accept instructions

Reading | ################################################## | 100% 4.33s

avrdude: Device signature = 0x1e910a
avrdude: NOTE: "flash" memory has been specified, an erase cycle will be performed
         To disable this feature, specify the -D option.
avrdude: erasing chip
avrdude: reading input file "/tmp/usbtiny.hex"
avrdude: writing flash (2046 bytes):

Writing | ################################################## | 100% 276.90s

avrdude: 2046 bytes of flash written
avrdude: verifying flash memory against /tmp/usbtiny.hex:
avrdude: load data flash data from input file /tmp/usbtiny.hex:
avrdude: input file /tmp/usbtiny.hex contains 2046 bytes
avrdude: reading on-chip flash data:

Reading | ##########                                         | 20% 593.63s^C
I'd say that's quite an improvement, and very well acceptable for a chicken-and-egg bootstrap flasher 
This project was featured on Hackaday.
Discussion
Great stuff, thanks for sharing. Will try this out!
That is brilliant man! Congratulations!
Really nice! Great idea!
Hi, great project. Can you post somewhere your libusb-based test utility ??
Thanks…
Hi Steve, thank you, but i can't compile it on Ubuntu. I got:
cc -Wall -O2 `pkg-config –cflags libusb-1.0` -c -o main.o main.c main.c:125: error: expected ‘=’, ‘,’, ‘;’, ‘asm’ or ‘attribute’ before ‘irq_cb’ main.c: In function ‘hidkey_alloc_transfers’: main.c:150: error: ‘irq_cb’ undeclared (first use in this function) main.c:150: error: (Each undeclared identifier is reported only once main.c:150: error: for each function it appears in.)
Any idea ??
Great idea! Congratulations!
Since the optocoupler is rated at 20 miliamps and between 1.2v and 1.4v as ideal operating condition, isn't a 470ohm resistor waaay to much? Shouldn't it be in the 180 to 190 range?
I need to ask you a question. I have a Atmega 328P lying around since they are not bootloaded. Can I load a bootloader on to them and using your method? I have all the parts you have used (USB keyboard and Phone Charger).
Hi Steve,would you please send the programmer suited for windows xp
Hi.
Great idea. Recently I had some pretty similar idea using a keyboard.
It is not limited to USB only and is used by controling keyboard LEDs:
http://matrixstorm.com/avr/tinyusbboard/#chickenoregg (http://matrixstorm.com/avr/tinyusbboard/bootloader/keyboardasp_v2.zip)
Best regards
I am trying to reapeat your experiment. Could you also post what to do after cloning github? Trying to compile it with command line provided by Ondrej Kolonicny complains about missing file “ac_cfg.h”. Thanx